Finally. Rainwater storage that looks as good as it makes you feel.

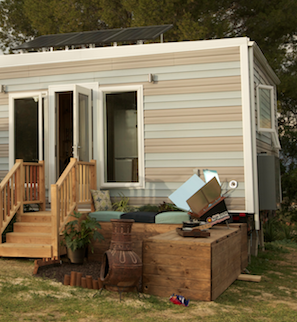
If you watch the show Tiny House Nation, you may have seen the 2 Rain Benches that Zack built exactly according to our plans. Each one was made using 3 heavy duty Second Rain Rain Bench liners and cedar lumber, which was stained a beautiful dark brown. They were set up in an ‘L’ outdoor seating arrangement for a total of 600 gallons of rainwater storage.
Wanna build one or two of your own?
 The Complete 300 gal Cedar Rain Bench DIY kit: includes 3 liners, downloadable instructions, as well as all necessary PVC fittings, internal tubing and a Saving Rain diverter. The only thing you purchase locally are lumber & screws, right off from the shopping list in the instructions, and enough extra tubing to reach wherever you place your Rain Bench…
300 gal Cedar Rain Bench DIY kit
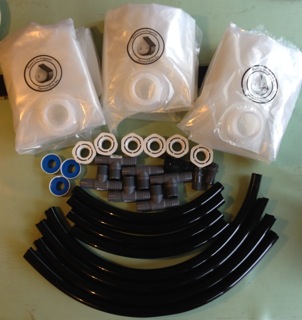
You will receive the instructions you can download immediately, so you can take the shopping list and start building your bench today. Then, when your DIY kit arrives, you just pop it in and start saving rain in style! The instructions in this kit show you exactly how to build a 96″L x 25″H x 33″W bench that holds 300 gallons of rainwater. This same kit can also be customized to hold up to 420 gallons by simply building it taller — as the liners’ maximum capacity is 140 gal each. The 300 gal Cedar Rain Bench DIY Kit Includes: 1) Illustrated step-by-step instructions (.pdf) to build your 300 gal Cedar Rain Bench **MADE IN THE USA** Materials to purchase separately: *Varies depending on how far away you place your bench. Adapters are included for garden hose too, but the flow is restricted more than 1″ I.D. tubing. Tools needed: 300 gal Cedar Rain Bench DIY kit: [wp_eStore_add_to_cart id=11] $239.98 Want to get the same instructions and ONLY the 3 specialty liners, save money and pick up the rest of the fittings and tubing locally? Here is that kit: 300 gal Cedar Rain Bench (3 Liners Only) kit: [wp_eStore_add_to_cart id=9] $139.98 Below: the finished products, 2 of the 300 gallon benches in and ‘L’ seating layout, for 600 gallons total capacity (That’s enough to keep a 10’x 10′ garden watered for over 2 months of NO RAIN!!): If you would rather find the fittings and tubing locally as well, our heavy duty Rain Bench liners are available individually ($49.95ea) or in case qty (less than $49.95ea), from our main store page. -with up to $300 in water incentives from SoCal Water$mart (http://socalwatersmart.com/index.php/qualifyingproducts/rain-barrels and more from various cities, they are willing to pay you to have a beautiful cedar rain bench.
3) Custom fitted 2-ply food grade liner, 32″x32″x32″
6) Mosquito resistant PVC fittings welded to liner
UV-resistant food grade tubing, 1″ I.D., 16’L
6) Reducers, 2″x1″ PVC thread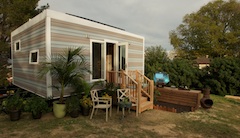
6) 1″ Tee thread to barb
2) 1″ barb to 3/4″ male hose adapter
1) Garden Hose shut-off valve
3) Rolls Teflon thread tape, 260″
If you live in southern California, you can get this DIY kit for FREE!
Here is a (very) quick vid of one going together…

Get Social